七.Go-Micro概览

总览

Go Micro是整个Micro工具集中提供微服务分布式系统开发的框架。

Go Micro提供了分布式系统开发的核心要求,包括RPC和时间驱动的通信。micro默认使用可插拔式的架构使得其十分健壮。Micro提供了默认配置使得上手十分容易,而且任何配置都很容易被替换。

源码地址:https://github.com/micro/go-micro

特性

Go Micro提取出了分布式系统的细节,提供了许多特性:

  • 服务发现 - 自动服务注册和名称解析。服务发现是微服务开发的核心。当服务A需要和服务B通话时,它需要知道该服务的位置。默认发现机制是多播DNS(mdns),一种零配置系统。

  • 负载均衡 - 基于服务发现的客户端负载均衡。一旦获得了服务的任意数量的实例的地址,我们需要一种方法来决定路由到哪个节点。我们使用随机散列负载均衡来提供服务之间的分配,并在出现问题时重试其他节点。

  • 消息编码 - 基于内容类型的动态消息编码。客户端和服务器将使用编解码器以及content-type来为您无缝编码和解码Go类型。各种消息可以被编码并从不同的客户端发送。客户端和服务器默认情况下使用protobuf和json来处理好这些工作

  • 请求/响应 - 基于RPC的请求/响应,支持双向流。我们提供了同步通信的一个抽象。一个服务器请求将会自动解析,负载均衡,连接微服务和序列化传输数据。默认传输是gRPC。

  • 异步消息 - PubSub内置为异步通信和事件驱动体系结构的遗留公民。事件通知是微服务开发中的核心模式。默认消息传递系统是HTTP事件消息代理

  • 可插拔式接口 - Go Micro对每个分布式系统抽象都使用Go接口。因此,这些接口是可插入的,并允许Go micro和runtime无关,你可插入任何底层技术

其中,Go micro比较特殊的一点就是可插拔式接口。Go micro对其框架中每个分布式系统抽象都使用了Go 接口,这些接口都有默认的实现方式,构成基本的Go micro框架。如果你想要对其中某个系统抽象进行替换,只需要实现它定义的接口即可。在 github.com/micro/go-plugins 仓库中可以找到许多可替换的插件。

模块

Go micro提取出了许多系统抽象,每个抽象都由Go接口实现,构成了其基本的组成模块。

Micro

注册(Registry)

registry提供了服务发现机制来解析服务名到地址上。它可以使用Consul、etcd、zookeeper、dns、gossip等提供支持。服务使用启动注册关闭卸载的方式注册。服务可以选择性提供过期TTL和定时重注册来保证服务在线,以及在服务不在线时把它清理掉。

1
2
3
4
5
6
7
8
9
type Registry interface {
Register(*Service, ...RegisterOption) error
Deregister(*Service) error
GetService(string) ([]*Service, error)
ListServices() ([]*Service, error)
Watch(...WatchOption) (Watcher, error)
String() string
Options() Options
}

选择器(Selector)

Selector是构建在注册上的负载均衡抽象。它允许服务被过滤函数过滤掉不提供服务,也可以通过选择适当的算法来被选中提供服务,算法可以是随机、轮询(客户端均衡)、最少链接等等。Selector是客户端级别的负载均衡,通过客户端创建语法时发生作用。

1
2
3
4
5
6
7
8
9
10
11
12
13
14
15
16
17
18
19
type Selector interface {
Init(opts ...Option) error
Options() Options
// Select returns a function which should return the next node

Select(service string, opts ...SelectOption) (Next, error)
// Mark sets the success/error against a node

Mark(service string, node *registry.Node, err error)
// Reset returns state back to zero for a service

Reset(service string)
// Close renders the selector unusable

Close() error
// Name of the selector

String() string
}

传输(Transport)

Transport是服务与服务之间同步请求/响应的通信接口。和Golang的net包,但提供更高级的抽象,允许我们可以切换通信方式,比如http、rabbitmq、websocket、NATs。传输也支持双向流,这一强大的功能使得客户端可以向服务端推送数据。

1
2
3
4
5
6
7
8
9
10
11
12
13
14
15
16
17
18
19
20
21
type Socket interface {
Recv(*Message) error
Send(*Message) error
Close() error
}

type Client interface {
Socket
}

type Listener interface {
Addr() string
Close() error
Accept(func(Socket)) error
}

type Transport interface {
Dial(addr string, opts ...DialOption) (Client, error)
Listen(addr string, opts ...ListenOption) (Listener, error)
String() string
}

代理(Broker)

Broker提供异步通信的消息发布/订阅接口。对于微服务系统及事件驱动的架构来说,发布/订阅是基础。一开始,默认我们使用收件箱方式的点到点HTTP系统来最小化依赖的数量。但是,在go-plugins是提供有消息代理实现的,比如RabbitMQ,NAT,NSQ,Google Cloud Pub Sub等等。

1
2
3
4
5
6
7
8
9
10
type Broker interface {
Options() Options
Address() string
Connect() error
Disconnect() error
Init(...Option) error
Publish(string, *Message, ...PublishOption) error
Subscribe(string, Handler, ...SubscribeOption) (Subscriber, error)
String() string
}

编码(Codec)

编码包用于在消息传输到两端时进行编码和解码,可以是json、protobuf、bson、msgpack等等。与其他编码方式不同,我们支持RPC,所以有JSON-PRC、PROTO-RPC、JSON-RPC等格式

1
2
3
4
5
6
7
8
9
10
11
12
13
14
15
16
type Codec interface {
ReadHeader(*Message, MessageType) error
ReadBody(interface{}) error
Write(*Message, interface{}) error
Close() error
String() string
}

type Message struct {
Id uint64
Type MessageType
Target string
Method string
Error string
Header map[string]string
}

Server(服务端)

Server包是使用编写服务的构建包,可以命名服务,注册请求处理器,增加中间件等等。服务构建在以上说的包之上,提供独立的接口来服务请求。现在服务的构建是RPC系统。

1
2
3
4
5
6
7
8
9
10
11
12
13
type Server interface {
Options() Options
Init(...Option) error
Handle(Handler) error
NewHandler(interface{}, ...HandlerOption) Handler
NewSubscriber(string, interface{}, ...SubscriberOption) Subscriber
Subscribe(Subscriber) error
Register() error
Deregister() error
Start() error
Stop() error
String() string
}

Client(客户端)

客户端提供接口来创建向服务端的请求。与服务端类似,它构建在其它包之上,提供独立的接口,通过注册中心来基于名称发现服务,基于选择器来负载均衡,使用传输和代理来处理同步、异步消息。

1
2
3
4
5
6
7
8
9
10
type Client interface {
Init(...Option) error
Options() Options
NewMessage(topic string, msg interface{}, opts ...MessageOption) Message
NewRequest(service, method string, req interface{}, reqOpts ...RequestOption) Request
Call(ctx context.Context, req Request, rsp interface{}, opts ...CallOption) error
Stream(ctx context.Context, req Request, opts ...CallOption) (Stream, error)
Publish(ctx context.Context, msg Message, opts ...PublishOption) error
String() string
}

Service(服务)

Service是server和client的封装,包含了一系列的方法去初始化server和client,使我们可以很简单地创建一个rpc服务

1
2
3
4
5
6
7
8
type Service interface {
Init(...Option)
Options() Options
Client() client.Client
Server() server.Server
Run() error
String() string
}

通过一张图将上述模块串起来:

Micro

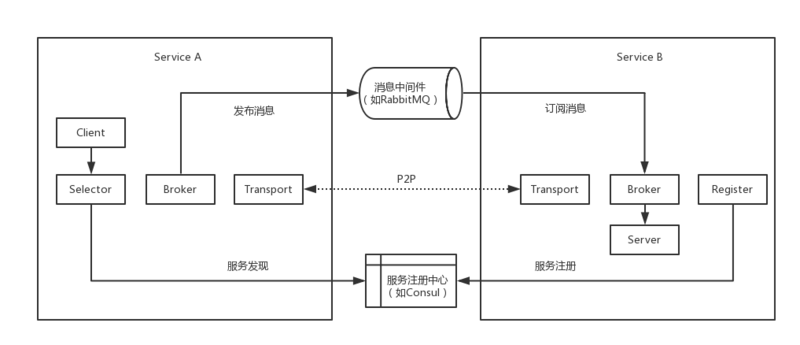
简单来说,就是server端通过Register进行服务注册。client端通过Selector进行负载均衡,然后通过算法从注册中心拿到对应的服务节点信息,最后选择Broker(异步)或Transport(同步)的方式与服务节点进行消息通信,消息的编解码由Codec完成。

Micro中有个概念是Turn anything into a micro service , 也就是说,上面的模块我们都可以将其看出一个微服务,并且可以通过实现接口自定义模块来对其进行替换。

示例

构建

创建服务模板

使用micro运行时工具运行命令micro new sample 创建一个基本的服务样例模板

1
2
3
4
5
6
7
8
9
10
11
12
13
14
15
16
17
18
19
20
21
22
23
24
25
26
27
28
➜ micro new sample
Creating service go.micro.srv.sample in sample
.
├── main.go
├── generate.go
├── plugin.go
├── handler
│ └── sample.go
├── subscriber
│ └── sample.go
├── proto/sample
│ └── sample.proto
├── Dockerfile
├── Makefile
├── README.md
├── .gitignore
└── go.mod

download protobuf for micro:

brew install protobuf
go get -u github.com/golang/protobuf/{proto,protoc-gen-go}
go get -u github.com/micro/protoc-gen-micro/v2

compile the proto file sample.proto:

cd sample
protoc --proto_path=.:$GOPATH/src --go_out=. --micro_out=. proto/sample/sample.proto

编译proto文件

编译proto文件生成服务所需要的go文件(确保所需要的插件都已安装)

1
2
3
4
5
6
7
8
9
10
11
12
13
14
15
16
17
18
19
20
21
22
23
➜  cd sample
➜ protoc --proto_path=.:$GOPATH/src --go_out=. --micro_out=. proto/sample/sample.proto

➜ tree
.
├── Dockerfile
├── Makefile
├── README.md
├── generate.go
├── go.mod
├── handler
│ └── sample.go
├── main.go
├── plugin.go
├── proto
│ └── sample
│ ├── sample.pb.go
│ ├── sample.pb.micro.go
│ └── sample.proto
└── subscriber
└── sample.go

4 directories, 12 files

编译服务

1
➜  go build -o sample-srv *.go

运行服务

1
2
3
➜  ./sample-srv
2020-04-18 10:16:50 level=info Starting [service] go.micro.srv.sample
2020-04-18 10:16:50 level=info Server [grpc] Listening on [::]:58890

通过micro运行时工具,来看看我们的微服务是否真的启动

1
2
3
➜  micro list services
go.micro.srv.sample
micro.http.broker

可以看到我们的sample服务已经启动起来了。

客户端调用

为了检测我们的微服务是否正常运作,我们可以简单的写一个客户端程序来调用微服务

1
2
3
mkdir client
cd client
vim main.go

1
2
3
4
5
6
7
8
9
10
11
12
13
14
15
16
17
18
19
20
21
22
23
24
25
26
27
package main

import (
"context"
"fmt"
"github.com/micro/go-micro/v2"
sample "sample/proto/sample"
)

func Call(service sample.SampleService, name string) (res *sample.Response, err error) {
res, err = service.Call(context.Background(), &sample.Request{Name: name})
return
}

func main() {
service := micro.NewService(micro.Name("go.micro.srv.sample.client"))
service.Init()

sampleService := sample.NewSampleService("go.micro.srv.sample", service.Client())
res, err := Call(sampleService, "world")
if err != nil {
fmt.Println(“服务端连接失败,err:", err)
}

fmt.Println("收到服务端返回消息:", res.Msg)

}

运行一下

1
2
➜  client go run main.go
收到服务端返回消息: Hello world

可以看到是没什么问题的。

说明

接下来让我们看看这个项目中具体做了什么。

proto

首先,proto/sample.proto 文件中定义了3个RPC接口,以及对应的数据结构

1
2
3
4
5
6
7
8
9
10
11
12
13
14
15
16
17
18
19
20
21
22
23
24
25
26
27
28
29
30
31
32
33
34
35
36
37
syntax = "proto3";

package go.micro.srv.sample;

service Sample {
rpc Call(Request) returns (Response) {}
rpc Stream(StreamingRequest) returns (stream StreamingResponse) {}
rpc PingPong(stream Ping) returns (stream Pong) {}
}

message Message {
string say = 1;
}

message Request {
string name = 1;
}

message Response {
string msg = 1;
}

message StreamingRequest {
int64 count = 1;
}

message StreamingResponse {
int64 count = 1;
}

message Ping {
int64 stroke = 1;
}

message Pong {
int64 stroke = 1;
}

通过命令:

1
protoc --proto_path=. --micro_out=. --go_out=. proto/sample/sample.proto

生成我们需要的go文件

1
2
3
4
5
6
7
8
9
10
11
12
13
14
15
16
17
18
19
20
21
➜  tree
.
├── Dockerfile
├── Makefile
├── README.md
├── generate.go
├── go.mod
├── handler
│ └── sample.go
├── main.go
├── plugin.go
├── proto
│ └── sample
│ ├── sample.pb.go
│ ├── sample.pb.micro.go
│ └── sample.proto
└── subscriber
└── sample.go


4 directories, 12 files

sample.pb.go文件中实现的是我们go micro框架中的Codec模块,完成的是消息的编解码功能。
sample.pb.micro.go 定义了我们的Server,Client,Service,以及注册

可以看到这些接口通过我们框架即可自动的生成,不需要我们再去一一完成。

hanlder

handler/sample.go 文件中实现了3个RPC接口

1
2
3
4
5
6
7
8
9
10
11
12
13
14
15
16
17
18
19
20
21
22
23
24
25
26
27
28
29
30
31
32
33
34
35
36
37
38
39
40
41
42
43
44
45
46
47
48
49
package handler

import (
"context"

"github.com/micro/go-micro/v2/util/log"

sample "sample/proto/sample"
)

type Sample struct{}

// Call is a single request handler called via client.Call or the generated client code
func (e *Sample) Call(ctx context.Context, req *sample.Request, rsp *sample.Response) error {
log.Log("Received Sample.Call request")
rsp.Msg = "Hello " + req.Name
return nil
}

// Stream is a server side stream handler called via client.Stream or the generated client code
func (e *Sample) Stream(ctx context.Context, req *sample.StreamingRequest, stream sample.Sample_StreamStream) error {
log.Logf("Received Sample.Stream request with count: %d", req.Count)


for i := 0; i < int(req.Count); i++ {
log.Logf("Responding: %d", i)
if err := stream.Send(&sample.StreamingResponse{
Count: int64(i),
}); err != nil {
return err
}
}

return nil
}

// PingPong is a bidirectional stream handler called via client.Stream or the generated client code
func (e *Sample) PingPong(ctx context.Context, stream sample.Sample_PingPongStream) error {
for {
req, err := stream.Recv()
if err != nil {
return err
}
log.Logf("Got ping %v", req.Stroke)
if err := stream.Send(&sample.Pong{Stroke: req.Stroke}); err != nil {
return err
}
}
}

handler 实现了3个RPC接口,实际上完成的是Transport同步消息功能。

subscriber

subscriber/sample.go 文件中实现了异步消息调用接口,完成的是Broker的功能

1
2
3
4
5
6
7
8
9
10
11
12
13
14
15
16
17
18
19
20
package subscriber

import (
"context"
"github.com/micro/go-micro/v2/util/log"

sample "sample/proto/sample"
)

type Sample struct{}

func (e *Sample) Handle(ctx context.Context, msg *sample.Message) error {
log.Log("Handler Received message: ", msg.Say)
return nil
}

func Handler(ctx context.Context, msg *sample.Message) error {
log.Log("Function Received message: ", msg.Say)
return nil
}

main

main.go完成服务的注册、运行,以及同步及异步接口的注册

1
2
3
4
5
6
7
8
9
10
11
12
13
14
15
16
17
18
19
20
21
22
23
24
25
26
27
28
29
30
31
32
33
package main

import (
"github.com/micro/go-micro/v2/util/log"
"github.com/micro/go-micro/v2"
"sample/handler"
"sample/subscriber"


sample "sample/proto/sample"
)

func main() {
// New Service
service := micro.NewService(
micro.Name("go.micro.srv.sample"),
micro.Version("latest"),
)

// Initialise service
service.Init()

// Register Handler
sample.RegisterSampleHandler(service.Server(), new(handler.Sample))

// Register Struct as Subscriber
micro.RegisterSubscriber("go.micro.srv.sample", service.Server(), new(subscriber.Sample))

// Run service
if err := service.Run(); err != nil {
log.Fatal(err)
}
}

client

client/main.go简单的实现了客户端对服务端微服务的调用

1
2
3
4
5
6
7
8
9
10
11
12
13
14
15
16
17
18
19
20
21
22
23
24
25
26
package main

import (
"context"
"fmt"
"github.com/micro/go-micro/v2"
sample "sample/proto/sample"
)

func Call(service sample.SampleService, name string) (res *sample.Response, err error) {
res, err = service.Call(context.Background(), &sample.Request{Name: name})
return
}

func main() {
service := micro.NewService(micro.Name("go.micro.srv.sample.client"))
service.Init()

sampleService := sample.NewSampleService("go.micro.srv.sample", service.Client())
res, err := Call(sampleService, "world")
if err != nil {
fmt.Println("客户端连接失败,err:", err)
}

fmt.Println("收到服务端返回消息:", res.Msg)
}

整个代码看下来是不是发现我们并没有看到什么几个模块的接口实现,这是因为框架的默认配置都帮我们实现好并隐藏到了框架当中,能够让我们服务开发者把主要精力都集中到业务开发上。

后面我们会慢慢扒开框架的面纱,看看隐藏在框架之下的是怎样一套运行逻辑。